
When I asked Justin what he fancied me making for this week’s Cakes & Bakes item, he replied: “I like jam, I like almonds, I like pastry.” So, that was my mission set; I’ve come up with jammy marzipan tartlets.

There are three stages to the method; the pastry, the marzipan and then the filling… four, if you count the bringing it all together.


Consequently, this means you can make the pastry and marzipan days – or even weeks (they can be prepared and frozen) – in advance if needed; making the filling and finishing off on the day.


The recipe is similar to a Bakewell tart – using marzipan rather than frangipane.

I have a cupboard full of my different home-made jams & jellies, so I chose a jar of mixed berry jelly for the bottom layer. If some of your jam/jelly bubbles up and leaks over (like half of mine did), don’t allow the tartlets to cool completely in the tin before trying to remove them. Unfortunately, my jelly set like cement and it was impossible to prise them out in one piece.

Despite this, they were gorgeous, bite-sized morsels of sweetness… and went down a treat with a cup of tea. I’ll be making these again!

Save my jammy marzipan tartlets recipe to Pinterest

- 90g/3oz plain flour
- 36g/1¼oz 'tant pour tant' (18g/⅔oz icing sugar + 18g/⅔oz ground almonds)
- pinch of salt
- 65g/2¼oz very cold butter, cubed
- ½-1 tbsp cold water
- 150g/5oz ground almonds
- 200g/7oz icing sugar + extra for rolling
- 2 tsp almond extract
- 1 egg white
- 100g/3½oz ground almonds
- 45g/1½oz caster sugar
- 2 eggs, beaten
- ½ tsp almond essence
- 1 tbsp fruit jam or jelly
- 15g/½oz flaked almonds


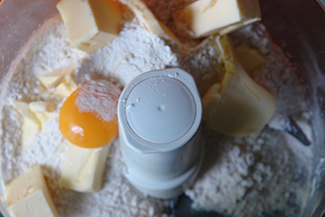
- Put the flour, icing sugar, ground almonds and salt into a food processor. Pulse a couple of times to combine
- Add the cold butter and pulse again until you get to the fine breadcrumb stage
- Whilst still pulsing, add the ice cold water until the mixture begins to get lumpy - like dry scrambled eggs
- Empty the pastry into ziplock bag and seal
- Form the dough into a ball by bringing it all together, still in the sealed ziplock bag, as if you’re making a snowball
- Chill in the fridge for ½ to 1 hour - you can use this time to make your marzipan (directions below)
- Once the pastry is chilled, grease a 6-hole muffin tin
- Lightly flour your work surface, remove your ball of dough from the fridge, unwrap and divide it into 6 equal pieces (about 20-22g each)
- One by one, roll each piece of dough into a ½cm thick round shape. Cut into perfect circles with a cookie cutter (or upturned drinking glass if you don't have one) that's slightly wider than the hole of your muffin tin. **Rolling each pie case individually means that you don't overwork the pastry by re-rolling over & over again**
- Gently press the pastry rounds into the muffin tin holes (handy hint: use a small lump of pastry to do this if you have long fingernails!)
- Set aside while you make the filling
- Put the ground almonds, icing sugar, almond extract and egg white into a food processor and combine until a thick ball of dough is formed
- Turn the paste out onto a work surface and knead it a few times. Roll it into a short, fat log (you want the diameter to be slightly smaller than the pastry case base). Wrap the log tightly in cling film and chill in the fridge for ½ to 1 hour - you can use this time to make your filling (directions below)
- Put the ground almonds and caster sugar into a bowl and combine
- Add the beaten eggs and almond essence and combine well
- Preheat the oven to 180ºC/350ºF/Gas mark 4
- Spread a generous layer of jam/jelly onto the bottom of each tartlet pastry case
- Remove the marzipan log from the clingfilm, Slice off 6 x ½cm rounds. Any unused marzipan will keep for a month in the fridge or 6 months in the freezer
- Place a round over the jam/jelly in each of the tartlet pastry cases
- Spoon over enough filling to just below the rim of the pastry case
- Sprinkle the top with a few flaked almonds and bake in the oven for 18-20 minutes, or until the filling is baked through and golden-brown all over
- Remove from the oven and allow to cool a few minutes in the muffin tin. Transfer to a wire rack to cool completely
- Dredge a little icing sugar over the tops
Cakes & Bakes: Prune and almond tart with Armagnac

About a month ago, we were watching an episode of Food Unwrapped where they investigated the benefit of prunes in keeping you… ahem, ‘regular’.
The presenters did a little compare & contrast experiment where, each day, one of them drank a glass of prune juice, another ate a couple of plums and the third ate a few prunes. The last proved to be by far the most effective way of upping your fibre intake.

The programme took a trip to Agen in France which apparently produces the best prunes in the world. That was it, I was straight online to order myself a bag of Agen prunes.
They didn’t lie, Agen prunes put all other prunes in the shade when it comes to taste and size. I’ve begun eating 3 prunes each morning and I can attest that the workings of my alimentary canal are markedly smoother than previously!

I searched through all my cookery books looking for a tempting recipe to try so as to mix my prune intake up a little. Eventually, I came across a prune and almond tart with Armagnac in Rick Stein’s French Odyssey. I don’t think I’ve not previously posted any of his recipes despite the fact that we love a lot of the food he makes.


We’re not big brandy drinkers and I couldn’t find anywhere that sold miniatures, but decided to invest in a bottle of Armagnac for this and future recipes – it’s often called for in both sweet and savoury dishes.
Stein’s instruction is to soak the prunes for an hour prior to using them. However, I think a more extensive soak (overnight / 8 hours or so) would improve matters.

Not that the tart wasn’t incredibly good anyway – believe me, it was! Pairing it with a dollop of crème fraîche really works too.
Click here to pin the recipe for later!

- 225g/8oz plain flour, sifted
- ½tsp salt
- 130g/4½oz butter, chilled & diced
- 1½-2tbs cold water
- 300g/10½oz mi-cuit (semi-dried) Agen prunes, stoned
- 4tbs Armagnac
- 1 large egg, lightly beaten
- 35g/1¼oz ground almonds
- 55g/2oz caster sugar
- 200ml/7fl oz crème fraîche
- icing sugar (for dusting)
- additional crème fraîche (for serving)

- Put the prunes into a bowl with the Armagnac and leave to soak for at least an hour, turning them occasionally to help them absorb the alcohol
- Put the flour and salt in a food processor or mixing bowl. Add the butter and work together to the fine breadcrumb stage
- Stir in the water with a round-bladed knife until it comes together into a ball
- Turn out onto a lightly floured work surface and kneed briefly until smooth
- Rest the pastry in a fridge for about 30 minutes before using
- Roll out the pastry and use it to line a greased, loose-bottomed flan tin (2½ cm deep, 24cm diameter)
- Prick the base all over and chill for 20 minutes
- Meanwhile, preheat the oven to 200°C/400ºF/Gas mark 6
- Blind bake the pastry case for 15 minutes then remove the blind baking gubbins and bake the case for a further 5 minutes
- Set the case aside and reduce the oven temperature to 190°C/ºF/Gas mark 5
- Drain the prunes over a bowl to reserve the remaining Armagnac
- Add the ground almonds, egg, sugar and crème fraîche to the Armagnac then beat together until smooth
- Distribute the prunes over the base of the pastry case and pour over the almond mixture
- Bake for 45 minutes or until golden brown and a skewer comes away clean
- Allow the tart to cool before dusting with a little icing sugar
- Serve with additional crème fraîche
Cakes & Bakes: Rhubarb and custard tart

One of the things that Todmorden is famous for is Incredible Edible, a group of local people who have started something of a revolution, growing food in public places in & around the town centre.

There are vegetables outside the police station and local community college, herbs along the canal tow-path and in the train station and an apothecary garden in the grounds of the health centre.

Everything is free for anyone to come along and help themselves – or even do a little weeding and clearing if the fancy takes them!

The train station is on one of our daily dog-walking routes and it’s been lovely watching the progress of the peas, red onions, chives and the like.

This week, along with the dog, I left the house with a pair of scissors and a carrier bag and cut a few stems of rhubarb – to use in a rhubarb and custard tart.

Rhubarb & custard is a classic British combination as is baked custard tart. I’ve put them together and come up with a delicious dessert.

I used the same pastry recipe as last week’s pear tart and made sure to add a tad more sugar than normal to the custard recipe… and a tablespoonful of Bird’s Custard Powder.

The sweetness of the custard and the tartness of the rhubarb worked incredibly well – I’ll be making this one again before the end of the rhubarb season.

Rhubarb and custard tart
Ingredients
For the pastry base
- 200 g/7oz plain flour
- 60 g/2oz icing sugar
- pinch of salt
- 125 g/4½oz very cold butter
- 1 egg yolk
For the custard
- 400 ml/14 fl oz double cream
- 100 ml/3½ fl oz creamy milk
- 2 eggs plus 2 yolks
- 100 g/3½oz caster sugar
- 1 tbsp custard powder
- 1 tsp vanilla extract
Instructions
For the pastry base
- Put the flour, icing sugar and salt in the bowl of a food processor and pulse a couple of times to combine
- Scatter the pieces of butter over the dry ingredients and pulse until the butter is cut in coarsely - you'll have pieces the size of oatmeal flakes and pea-size pieces and that's just fine
- Stir the egg, just to break it up, and add it a little at a time, pulsing after each addition
- When the egg is in, process in long pulses - about 10 seconds each - until the dough, which will look granular soon after the egg is added, forms clumps and curds
- Just before your pastry reaches this clumpy stage, the sound of the machine working the dough will change, so listen out
- Turn the dough out onto a work surface. Very lightly and sparingly - make that very, very lightly and sparingly - knead the dough just to incorporate any dry ingredients that might have escaped mixing
- Butter the tart tin and press the dough evenly along the bottom and up the sides of the tin. Don't be stingy - you want a crust with a little heft because you want to be able to both taste and feel it. Also, don't be too heavy-handed - you want to press the crust in so that the pieces cling to one another and knit together when baked, but you don't want to press so hard that the crust loses its crumbly shortbread-ish texture
- Freeze the pastry for at least 30 minutes, preferably longer, before baking
- Preheat the oven to 175ºC/375ºF/Gas mark 4
- Butter the shiny side of a piece of aluminium foil and fit the foil tightly against the pastry
- Bake the pastry for 25 minutes, then carefully remove the foil. If the pastry has puffed up, press it down gently with the back of a spoon
- Bake for another 3 to 5 minutes, then transfer the pastry case to a cooling rack; keeping it in its tin
For the custard
- In a heavy-bottomed saucepan, slowly bring the cream and milk to a simmer
- In a large, heat-proof measuring jug, whisk together the eggs, yolks, sugar, custard powder and vanilla extract
- Pour the hot cream & milk mixture into the bowl, whisking continuously
- Carefully strain the custard on to the cooked pastry base (don't overfill)
- Slice the rhubarb into lengths and place into a pattern in the custard
- Carefully put the tart tin into the oven (rearrange the rhubarb lengths if they drift in the liquid during the move!)
- Bake for 40 minutes or until the top begins to brown
- Remove from the oven, sprinkle a little granulated sugar over the top and allow to cool on a wire rack before slicing and serving

Cakes & Bakes : French pear tart

It takes quite a few stages to make this French pear tart but it’s well worth the time and effort needed. If you don’t think you’ll have the time all in one day to do it, you can prepare most of it well in advance and bring it all together on the day you plan to bake & serve it.

You can whiz up the pastry, press it into the tart tin and freeze it… weeks in advance.
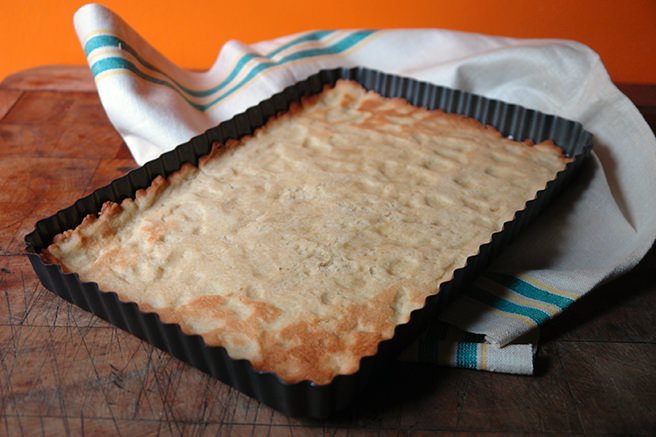
I must admit, it has got to be – by a country mile – the most delicious pastry I’ve ever made!

You can cut corners (and time) by using tinned pears or simply omitting the poaching stage if using fresh fruit.

The almond cream can be made a couple of days before and left covered & chilled in the fridge until just before it’s due to be put in the oven.

My rectangular tart tin is so large that I had to double up the almond cream recipe and cut the pears into quarters rather than halves.

The resulting tart is very attractive (not to mention photogenic!) and can be cut so each person gets a neat slice of pear.

It’s moist and sweet – sweet enough to serve with a dollop of tangy crème fraîche or thick Greek yoghurt on the side.


The perfect bake for a dinner party or daily treat.

French pear tart
Ingredients
For the pastry
- 200 g/7oz plain flour
- 60 g/2oz icing sugar
- pinch of salt
- 125 g/4½oz very cold butter
- 1 egg yolk
For the pears
- 3 medium pears
- 1 lemon
- 1 litre water
- 250 g/9oz granulated sugar
For the filling
- 85 g/3oz butter softened
- 150 g/5oz caster sugar
- 75 g/2½ ground almonds
- 2 tsp plain flour
- 1 tsp cornflour
- 1 egg
- 2 tsp dark rum or vanilla essence
Instructions
For the pastry
- Put the flour, icing sugar and salt in the bowl of a food processor and pulse a couple of times to combine
- Scatter the pieces of butter over the dry ingredients and pulse until the butter is cut in coarsely - you'll have pieces the size of oatmeal flakes and pea-size pieces and that's just fine
- Stir the egg, just to break it up, and add it a little at a time, pulsing after each addition
- When the egg is in, process in long pulses - about 10 seconds each - until the dough, which will look granular soon after the egg is added, forms clumps and curds
- Just before your pastry reaches this clumpy stage, the sound of the machine working the dough will change, so listen out
- Turn the dough out onto a work surface. Very lightly and sparingly - make that very, very lightly and sparingly - knead the dough just to incorporate any dry ingredients that might have escaped mixing
- Butter the tart tin and press the dough evenly along the bottom and up the sides of the tin. Don't be stingy - you want a crust with a little heft because you want to be able to both taste and feel it. Also, don't be too heavy-handed - you want to press the crust in so that the pieces cling to one another and knit together when baked, but you don't want to press so hard that the crust loses its crumbly shortbread-ish texture
- Freeze the pastry for at least 30 minutes, preferably longer, before baking
- Preheat the oven to 175ºC/375ºF/Gas mark 4
- Butter the shiny side of a piece of aluminium foil and fit the foil tightly against the pastry
- Bake the pastry for 25 minutes, then carefully remove the foil. If the pastry has puffed up, press it down gently with the back of a spoon
- Bake for another 3 to 5 minutes, then transfer the pastry case to a cooling rack; keeping it in its tin
For the pears
- Peel the pears, leaving them whole
- Bring water, sugar and the juice of the lemon to a boil in a saucepan just large enough to hold the pears
- Add the pears to the boiling syrup, lower the heat so the syrup simmers and gently poach the pears until they are tender when pierced with a knife - about 15 minutes
- Cool the pears to room temperature in the syrup
For the filling
- Put the butter and sugar in the bowl of a food processor and process until the mixture is smooth and satiny
- Add the ground almonds and continue to process until well blended
- Add the flour, cornflour and egg. Process until the almond cream is homogeneous
- Add the rum or vanilla and process just enough to blend
To combine
- Fill the baked pastry case with the almond cream, spreading it even with an offset metal icing spatula
- Thinly slice each pear half crosswise, lift each half on a spatula and place carefully on to the almond cream to form an attractive pattern
- Bake the tart for 50 to 60 minutes, or until the almond cream puffs up around the pears and browns
- Transfer the tart to a wire rack to cool to just warm or to room temperature before removing it from its tin
- Allow to cool completely before serving

Copyright © 2007-2026 · All rights reserved · H is for Home