Cakes & Bakes: Walnut and sultana loaf

Sliced, home-made walnut and sultana loaf | H is for Home

I’ve decided to make a walnut and sultana loaf this week by tweaking a basic white bread recipe that I regularly use. I didn’t have enough white flour in store so I substituted a quarter with wholemeal. It was a good decision as it added to the nuttiness of the finished loaf.

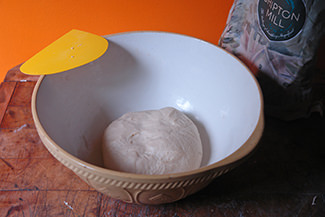
Home-made walnut and sultana loaf dough in a mixing bowl with cane banneton | H is for Home

Sliced or torn pieces of this bread will go amazingly well with a mild, creamy blue cheese such as Dolcelatte, Saint Agur or Roquefort.

Home-made walnut and sultana loaf dough profing in a cane banneton | H is for Home Home-made walnut and sultana loaf dough profing in a cane banneton | H is for Home

Another good option would be a couple of dipping bowls of good quality olive oil and balsamic vinegar. Once the loaf’s a couple of days old, have it toasted and spread with butter and honey.

Home-made walnut and sultana loaf | H is for Home

Walnut and sultana loaf
Ingredients
  1. 7g/¼oz fast action yeast
  2. 1tsp sugar
  3. 300ml/10½fl oz warm water
  4. 500g/18oz strong bread flour
  5. 1tsp salt
  6. 50g/1¾oz chopped walnuts
  7. 50g/1¾oz sultanasHome-made walnut and sultana loaf ingredients
Add ingredients to shopping list
If you don’t have Buy Me a Pie! app installed you’ll see the list with ingredients right after downloading it
Instructions
  1. In a measuring jug, stir the yeast and sugar into the warm water. Leave for 10 minutes for the yeast to begin working
  2. In a large mixing bowl add the flour. Make a well in the centre
  3. Add the liquid and knead until a smooth ball of dough is formed (I used my Kenwood mixer with dough hook attachment on a low speed for about 10 minutes, but you can do it by hand on a floured work surface for about 20 minutes)
  4. Cover the mixing bowl with cling film or put it into a large, clear plastic bag and leave in a warm place until the dough has doubled in size.
  5. Add the salt, chopped walnuts and sultanas and knead lightly until the fruit & nuts are evenly distributed through the dough
  6. Place in a greased loaf tin (or in a well-floured banneton like I did) and re-cover and allow to prove again until doubled in size
  7. Preheat the oven to 260ºC/500ºF/Gas mark 10, put an empty roasting dish on the bottom shelf of the oven and fill a cup with cold water and set aside
  8. Once the loaf has risen, if using a banneton, grease a baking sheet and gently decant the loaf on to it, trying not to knock any air out of it
  9. Quickly & carefully pour the cup of water into the roasting dish before putting the loaf into the oven
  10. After 10 minutes, turn the oven down to 200ºC/ 400ºF/Gas mark 6
  11. Bake for a further 20-25 minutes before taking it out of the oven
  12. Leave to cool on a wire rack for at least half an hour before use
Print
H is for Home Harbinger https://hisforhomeblog.com/

Cakes & Bakes: Panipopo

Portion of home-made panipopo torn form the loaf | H is for Home

I’ve been seeing recipes for panipopo sweeping by on my Pinterest feed for quite a while. I’ve never really stopped & clicked because I thought that the sweetened coconut bread would be too wet and sickly sweet.

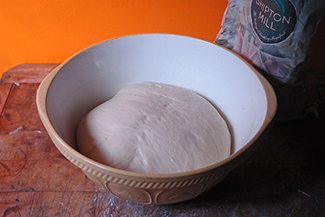
Panipopo dough | H is for Home Risen panipopo dough | H is for Home

How wrong I was! I’m glad I read some of the comments remarking on how delicious it is and how ex-pat islanders hanker after it when they’re far away from home.

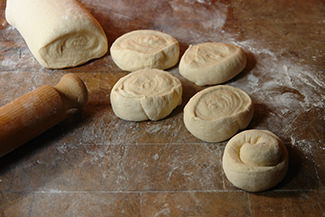
Rolled & sliced panipopo dough | H is for Home Panipopo dough in a rectangular baking tin | H is for Home

Panipopo (or pani-popo or pani popo) is a Polynesian bread originating from Samoa or Hawaii – depending on who you believe.

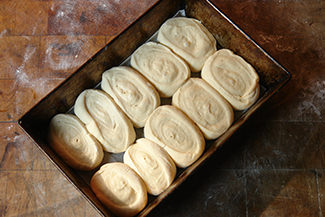
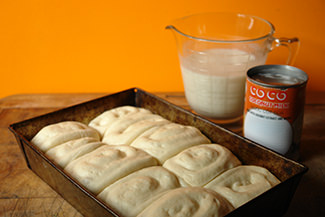
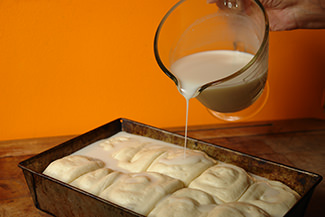
Risen panipopo dough in a rectangular baking tin | H is for Home Pouring sweetened coconut milk on the risen panipopo dough | H is for Home

I thought that all that liquid would make for a soggy bread, but most of it is absorbed by the dough in cooking. The liquid that is left turns into a thick, unctuous, syrupy sauce. We weren’t sure what to eat it with – I chose to have it as it comes, dunking it in more of the  sauce that I’d reserved. Justin went all adventurous and had his with a little bit of Cambozola… he reckons it’s a winner.

Cooked panipopo on a oven cloth | H is for Home

Here’s the recipe – why don’t you have a go? Let us know what you think!

Panipopo

SamoaFood.com
Cook Time 25 minutes
Course Bread
Cuisine Polynesian

Ingredients
  

For the dough

  • 7 g/¼oz active dry yeast
  • 240 ml/8½ fl oz warm water
  • 450 g/16oz plain or bread flour
  • 50 g/1¾oz caster sugar
  • ½ tsp salt
  • 1 egg
  • 2 tbsp vegetable oil

For the coconut sauce

  • 200 ml/7 fl oz tinned coconut milk check the tin, mine was already diluted to 50% coconut milk, 50% water
  • 200 ml/7 fl oz water omit this if your coconut milk is already diluted
  • 100 g/3½oz caster sugar

Instructions
 

For the dough

  • In a measuring jug, stir the yeast into the warm water and leave for 10 minutes
  • In a large mixing bowl, combine the flour, sugar and salt
  • In another measuring jug, lightly mix the egg and vegetable oil
  • Make a well in the centre of the flour mixture and pour in the wet ingredients. Combine well, adding a little more flour if the dough is too sticky
  • Empty out the dough on to a floured surface and knead for 10-20 minutes until smooth and elastic
  • Put the dough back into the mixing bowl, cover with cling film or put inside a large plastic bag. Leave in a warm place to prove until doubled in size
  • Grease a large, deep rectangular or round baking tin. Set aside
  • Punch the dough down and turn it out onto a lightly floured surface
  • Roll the dough into a long rectangle, roll it up and slice it into 2.5cm/1-inch or any even-sized rounds
  • Put the rounds into the baking tin, cover with cling film or put into a large plastic bag and allow to prove until doubled in size
  • Wile the bread is proving, preheat the oven to 180ºC/375°F/Gas mark 4

For the coconut sauce

  • In a large measuring jug, combine the coconut milk, water (if using) and sugar and stir until all the sugar has dissolved
  • When the dough has doubled in size, pour the coconut sauce evenly over the dough
  • Bake for 25-30 minutes until the top of the bread is has turned a golden brown
  • Allow them to cool in the tin for at least an hour before serving
Keyword bread, coconut, Panipopo

Cakes & Bakes: Daktyla

Home-made daktyla | H is for Home

A couple of weeks ago, I bought a small jar of black onion seeds with the plan of using it in and sprinkled on a home-made loaf of onion bread. Little did I know that onion seeds aren’t actually… onion seeds! I tasted a pinch expecting a blast of onion flavour, it had a slight onion/black pepper/earthy taste, not altogether unpleasant though.

Bubbling bread sponge | H is for Home

When I looked it up, black onion seeds are actually nigella seeds; they’re also commonly known as black cumin or kalonji. Love in a Mist, which grows on our allotment, is a very close relation. I wonder whether it’s seeds are also edible.

Mixture of sponge, flour, olive oil and seeds | H is for Home

Anyhow, since my onion loaf idea was scuppered (at least for the time being) I looked into what I could make using my black onion seeds. That’s when I came across daktyla, a Greek/Cypriot/Turkish rustic bread.

Rising daktyla dough | H is for Home

The seeds are mixed with sesame seeds both in and atop a sort of tear-and-share loaf made up of rows of dough. Δάχτυλα, (daktyla in Greek) means ‘fingers’.

Daktyla dough balls | H is for Home Daktyla dough batons

I just happened to have a large bag of black sesame seeds that I bought in a Chinese supermarket, so I already had all the necessary ingredients in stock.

Sprinkling seeds on daktyla dough | H is for Home

There was quite a lot of proofing time involved – an hour for the sponge, 90 minutes for the first proof, another 90 for the second – but it meant that I could get on and do other things in between time.

Details of cooked daktyla | H is for Home

It was delicious with baba ganoush and salad. I imagine it would go down well with hummus, feta and Anari cheeses, olives and cured meats.

Click here to save this daktyla recipe to Pinterest for later!

Home-made daktyla | H is for Home

Daktyla

King Arthur Flour
Course Bread
Cuisine Turkish
Servings 8

Ingredients
  

For the sponge

  • 130 g/4½oz strong white bread flour
  • 70 g/2½oz cornmeal/polenta
  • 7 g/¼oz instant yeast
  • 300 ml/10½ fl oz warm water

For the dough

  • 240 g/8½oz strong white bread flour
  • tsp salt
  • 2 tbsp olive oil
  • 30 g/1oz toasted sesame seeds + 1tbsp to sprinkle over the loaf
  • 1 tbsp nigella seeds + 1tsp to sprinkle over the loaf

Instructions
 

For the sponge

  • In a large mixing bowl, combine the strong white bread flour, cornmeal, yeast and warm water making sure there are no lumps (A Danish dough whisk is perfect for this job). Allow the mixture rest for an hour, or until it's foamy and full of bubbles

For the dough

  • Combine the remaining ingredients into the sponge and knead - by hand, mixer, food processor or bread machine - to form a soft, supple dough, adding a small amount of extra water or flour as needed
  • Place the dough in a greased bowl, and cover it with a proof cover or cling film. Allow it to rise for 1½ hours, or until almost doubled in size
  • Turn the dough out onto a lightly floured or greased work surface and divide the dough into 8 pieces. Round each piece into a ball, then shape each into a baton about 10cm/4-in in length
  • Grease or line with parchment, a 46 x 33cm / 18 x 13-in baking sheet
  • Place the ovals of dough side by side (long sides almost touching each other) on the sheet, leaving about 2½cm/1-in between each; they'll fill the pan end to end
  • Cover the baking sheet and allow the dough rise in a warm place for 1 hour, or until it's expanded enough so that the ovals are touching each other
  • Brush the top of the dough very lightly with water (or spray it gently), and sprinkle with a mixture of toasted sesame seeds and nigella seeds
  • Bake in a preheated oven at 190ºC/375°F/Gas mark for 25-30 minutes, until it's golden brown
  • Allow to cool completely on a wire rack
Daktyla ingredients
Keyword bread

Cakes & Bakes: Flatbread

Detail of home-made flatbread | H is for Home

I’ve made a few different types of flatbread in the past, but this one is by far the quickest and easiest to date – probably the best tasting too!

Milk and ghee in a glass measuring jug | H is for Home

Being a flatbread, there’s no added yeast – so no long proofing times; there’s also no heavy kneading.

Flatbread dough divided into quarters | H is for Home Rolling out flatbread dough into rounds | H is for Home

You can make the dough in advance and then fry off when required. You could even roll out each flatbread, layer between parchment paper, wrap in cling film and freeze for up to 6 months.

Home-made flatbread | H is for Home

It’s so flexible when it comes to serving suggestions, we don’t know where to start. You can have it with a selection of dips or fill with salads, roast vegetables, kebabs etc. They’d be great served alongside Indian, Mediterranean or Middle Eastern cuisine – they’re so versatile

Stuffed home-made flatbread | H is for Home

For today’s first outing I tried it with a delicious smoked humous and Justin plumped for a spicy Moroccan chicken affair. We both really fancy it with babaganoush – so it just might be on the menu again tomorrow!

Click here to save this flatbread recipe to Pinterest!

Flatbread
Yields 4
Ingredients
  1. 300g/10½oz strong bread flour flour (level cups, unsifted, not packed), plus extra for dusting
  2. ½ tsp salt
  3. 50g/1¾oz ghee
  4. 180ml/6 fl oz milk
  5. 2-3 tbsp olive oil or ghee (for frying)Home-made flatbread ingredients
Add ingredients to shopping list
If you don’t have Buy Me a Pie! app installed you’ll see the list with ingredients right after downloading it
Instructions
  1. Put the butter and ghee into a measuring jug and heat in the microwave until the ghee is just melted. Stir to combine
  2. In a large mixing bowl, bring together the flour, salt and ghee/milk mixture into a smooth dough. Add a little more flour if sticky
  3. Lightly sprinkle a work surface with flour, turn out the dough and knead for a minute or two
  4. Wrap in clingfilm and rest at room temperature for about half an hour
  5. Sprinkle the work surface again with a little flour, remove the dough from the clingfilm and divide the dough into 4 equal pieces
  6. Form each piece into a ball and roll out into about ⅛" / ⅓cm thick rounds
  7. Heat 1 tbsp olive oil/ghee in a heavy-bottomed skillet pan over a medium-high heat
  8. Carefully lay one of the flattened dough rounds in the pan and fry for about a minute. Flip over and cook the other side, pressing down with a spatula where it puffs up
  9. Stack the cooked flatbreads on top of each other - the moisture helps soften the surface, making them even more pliable
  10. Serve straight away or they can be reheated by re-frying on low heat, 30 seconds each side
Print
H is for Home Harbinger https://hisforhomeblog.com/