Cakes & Bakes: Seeded sourdough boule

Home-made sliced seeded sourdough boule

For this week’s Cakes & Bakes recipe we have a delicious, crusty, seeded sourdough boule (a fancy French word for a round, slightly domed loaf).

Sourdough starter in a clear glass bowl | H is for Home

My starter and, as a result, dough are getting quite lively in this warmer weather!

proofed boule in a cane banneton | H is for Home

The seeds add texture and and depth of flavour, with distinctive little hits as you crunch through individual seeds. You could even lightly toast them before adding them to the dough – something which I’ll try next time.

Cooked sourdough boule | H is for Home

It’s a very versatile loaf, suitable for accompanying all manner of meals and perfect for sandwiches. It makes for great toast too! We enjoyed ours liberally spread with a lovely soft goat’s cheese on day 1 – and then it was transformed into the aforementioned toast and served with poached eggs on day 2. Both fabulous!

A delicious, crusty, seeded sourdough boule

Click here to save the recipe to Pinterest

Seeded sourdough boule
Yields 1
Prep Time
23 hr
Cook Time
1 hr
Total Time
24 hr
Prep Time
23 hr
Cook Time
1 hr
Total Time
24 hr
Ingredients
  1. 350g/12⅓oz water at 27ºC/80ºF
  2. 108g/3¾oz fresh sourdough starter (100% hydration) that has been refreshed the night before and again in the morning
  3. 400g/14oz strong white bread flour
  4. 140g/5 strong wholemeal bread flour
  5. 150g/5oz lightly toasted mixed seeds (sesame, poppy, sunflower, pumpkin, flax, linseeds, pine nuts etc.)
  6. 6g/¼oz fine salt
  7. a little rice flour for dusting your bannetonHome-made seeded sourdough boule ingredients
Add ingredients to shopping list
If you don’t have Buy Me a Pie! app installed you’ll see the list with ingredients right after downloading it
Instructions
  1. In a large mixing bowl, whisk the warm water and starter to combine
  2. Knead in the flour, cover with a reusable food cover / cling film and let the dough rest in a cool environment for 1½ hours
  3. Add the seeds and salt and mix until all the ingredients come together into a large ball
  4. Lift and fold your dough over, do a quarter turn of your bowl and repeat three more times. Repeat hourly 3 more times
  5. Shape your dough lightly and place it into a dusted banneton
  6. Cover again and refrigerate (overnight) for 8-12 hours
  7. Remove from the fridge and allow to warm and prove until the dough has risen by about 50%. This normally takes about 2 hours in a kitchen that is about 18-20ºC
  8. Preheat the oven to 220ºC/425ºF/Gas mark 7 for ½-1 hour (also preheat your La Cloche or baking stone if using)
  9. Gently remove the loaf from the banneton, slash the top of with a lame (grignette) and put it into the oven
  10. Bake for 40 minutes, turn the heat down to 190ºC/375ºF/Gas mark 5 and bake for another 10-15 minutes depending on how brown you like the crust
  11. Allow the loaf to cool completely (at least an hour) on a wire rack before slicing
Print
H is for Home Harbinger https://hisforhomeblog.com/

Cakes & Bakes: Seeded sourdough loaf

Slices of home-made seeded sourdough loaf | H is for Home

Since I revived my sourdough starter a fortnight ago, we’ve been enjoying pancakes (for brunch on Justin’s birthday), waffles and last week’s raisin bread. This week, I made a seeded sourdough loaf.

Sourdough autolyse, mixed seeds and ground pink Himylayan salt | H is for Home

To begin with, I used my go-to overnight sourdough recipe and simply added a selection of seeds. It’s a very good recipe for using up bits & pieces of packets of seeds you have in the cupboard. However, if you don’t use seeds that often, rather than buy a bag each of say sunflower seeds, pumpkin seeds and linseeds, Morrisons (and all large supermarkets, probably) do little packets of ready mixed seeds.

Loaf proving in a banneton | H is for Home

Also, I changed the order of cooling and proving. Vanessa Kimbell recommends proving for a couple of hours and then putting it into the fridge. To begin with, I do the final folding at night and put the loaf in its banneton straight into the fridge. Then, in the morning, I bring it out to prove while the oven preheats – that way round works better for me!

Home-made seeded sourdough loaf | H is for Home

It made a delicious, crusty 1kg loaf. Sliced, it’s perfect with bowls of soup – or on its own with just a bit of butter. The good thing about home-made sourdough bread is that it can last over a week without going mouldy. After a number of days, as the loaf begins to go hard, it makes brilliant toast or bruschetta; the twice-cooked seeds impart an even nuttier taste.

If you want to try it out, click here to save the recipe to Pinterest for later

Home-made seeded sourdough loaf | H is for Home
Seeded sourdough loaf
Yields 1
Total Time
24 hr
Total Time
24 hr
Ingredients
  1. 350g water at 27ºC
  2. 108g fresh sourdough starter (100% hydration) that has been refreshed the night before and again in the morning
  3. 540g strong white bread flour
  4. 50g mixed seeds (anything like sesame, sunflower, pumpkin, flax, pine nuts or linseeds)
  5. 6g fine salt
  6. a little rice flour for dusting your bannetonHome-made seeded sourdough loaf ingredients
Add ingredients to shopping list
If you don’t have Buy Me a Pie! app installed you’ll see the list with ingredients right after downloading it
Instructions
  1. In a large mixing bowl, whisk the warm water and starter to combine
  2. Knead in the flour, cover with a reusable food cover / cling film and let the dough rest in a cool environment for 1½ hours
  3. Add the seeds and salt and mix until all the ingredients come together into a large ball
  4. Lift and fold your dough over, do a quarter turn of your bowl and repeat three more times. Repeat hourly 3 more times
  5. Shape your dough lightly and place it into a dusted banneton
  6. Cover again and refrigerate (overnight) for 8-12 hours
  7. Remove from the fridge and allow to warm and prove until the dough has risen by about 50%. This normally takes about 2 hours in a kitchen that is about 18-20ºC
  8. Preheat the oven to 220ºC for ½-1 hour (also preheat your La Cloche or baking stone if using)
  9. Gently remove the loaf from the banneton, slash the top of with a lame (grignette) and put it into the oven
  10. Bake for 40 minutes, turn the heat down to 190ºC and bake for another 10-15 minutes depending on how brown you like the crust
  11. Allow the loaf to cool completely (at least an hour) on a wire rack before slicing
Print
H is for Home Harbinger https://hisforhomeblog.com/

Cakes & Bakes: Raisin sourdough loaf

Slice of home-made raisin sourdough loaf | H is for Home

I’ve resurrected my starter after spending 3 weeks away from home – abroad in Trinidad. Justin requested a sourdough raisin loaf, but with no added spices, so that it would be more versatile with regards to teaming it with other food and dishes.

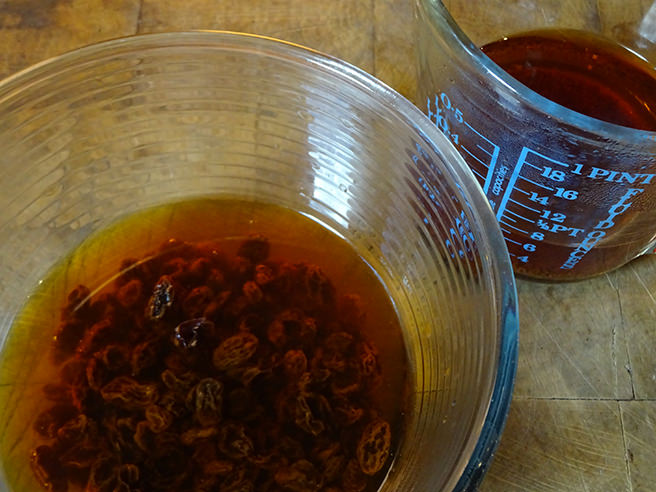
Saoking raisins in strong black tea | H is for Home

I like to pre-soak the dried fruit that I use in baked goods as it stops them drying out and burning in the oven. Depending on what you’re making, you can soak them in strong tea, alcohol or plain old water.

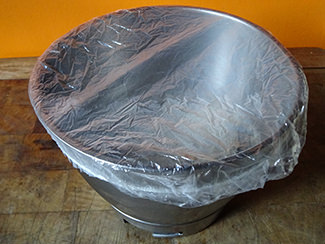
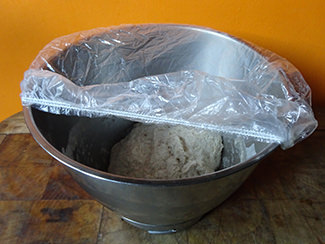
Covering raisin soudough loaf dough with food 'shower cap' | H is for Home Covering raisin soudough loaf dough with food 'shower cap' | H is for Home

On self same trip to Trinidad, the friend that I stayed with introduced me to some wonderfully useful kitchen devices – if you can call them that. They’re like shower caps for covering food… just brilliant! She bought them in a dollar store when she was visiting her sister in the USA. They come in 3 different sizes and the largest is the perfect circumference for fitting over the bowl of my vintage Kenwood mixer and 1-kilo-sized round banneton. They’re reusable and knock the socks of cling film and the plastic bags that I’ve been using. For those of you that are interested, I’ve since found them for sale in Lakeland.

Raisin sourdough loaf dough proofing in a banneton | H is for Home

I adapted a recipe by Vanessa Kimbell, baker, teacher, originator of my favourite 24-hour sourdough loaf recipe and the author of The Sourdough School: The Ground-breaking Guide to Making Gut-friendly Bread.

Raisin sourdough loaf on a breadboard with a wooden handled bread knife | H is for Home

Click here to save my raisin sourdough loaf recipe to Pinterest

Raisin sourdough loaf
Yields 1
Cook Time
1 hr 10 min
Cook Time
1 hr 10 min
Ingredients
  1. 100g/3½oz raisins, soaked in strong tea for at least an hour
  2. 215g/7½oz water
  3. 180g/6⅓oz sourdough starter (100% hydration)
  4. 90g/3oz wholemeal flour
  5. 305g/10¾oz strong white flour
  6. 10g/⅓oz fine salt
  7. 13g/½oz cold waterHome-made raisin sourdough loaf ingredients
Add ingredients to shopping list
If you don’t have Buy Me a Pie! app installed you’ll see the list with ingredients right after downloading it
Late afternoon
MIX
  1. In a large bowl whisk your water and starter and mix well. Add all the flour and mix until all the ingredients come together into a large ball
  2. Cover with a clean damp cloth and let the dough rest on the side in the kitchen for between 30 minutes and 2 hours – this is what bakers call the 'autolyse'
FOLD
  1. Add the salt mixed with the water and dimple your fingers into the dough to allow the salty water and salt to distribute evenly throughout the dough. Leave for 10 minutes
  2. Next, lift and fold your dough over, do a quarter turn of your bowl and repeat three more times. Repeat 3 times at 30-minute intervals with a final 15-minute rest at the end
SHAPE
  1. Shape the dough lightly into a ball then place into a round banneton dusted with flour (If you don’t have a banneton, use a clean tea towel dusted with flour inside a colander). Dust the top with flour, then cover with a damp tea-towel
PROVE
  1. Transfer the dough in its covered banneton to the fridge and leave to prove there overnight for 8-12 hours
Following morning
  1. Take the banneton out of the fridge to allow your dough to warm up and finish proving (it should get to 50% bigger than when it went into the fridge)
BAKE
  1. Preheat the oven to 220°C/450ºF/Gas mark 8 for at least 30 minutes before you're ready to bake. Place your cloche, Dutch oven or baking stone in the oven and a large pan of boiling water underneath. The hydration helps form a beautiful crust
  2. Once the oven is up to full heat, carefully remove the cloche/Dutch oven/baking stone from the oven, taking care not to burn yourself. Dust with a fine layer of semolina or rice flour, which stops the bread sticking, then put your dough onto the baking stone and slash the top with your blade. This decides where the bread will tear as it rises. Bake for an hour
  3. Turn the heat down to 180°C/350ºF/Gas mark 4 (and remove the lid if you're using a cloche or Dutch oven) and bake for another 10-15 minutes. You need to choose just how dark you like your crust but I suggest that you bake until it's a dark brown - it tastes much better
Print
Adapted from Vanessa Kimbell's basic sourdough recipe
H is for Home Harbinger https://hisforhomeblog.com/

Cakes & Bakes: Fried bakes

Home-made fried bake | H is for Home

Following on from last week’s pholourie recipe, here’s another of my favourite fried foods that hails from Trinidad – fried bakes (or fry-bake, if you’re a proper Trini!). ‘Fried bakes’ – a contradiction in terms!

Press cutting from the Trinidad & Tobago Guardian containing bakes receipes | H is for Home

My aunt sent me a recipe that she cut out of the TT Guardian – complete with a few of her personalisation notes!

Dry & wet ingredients that go into making fried bakes Fried bakes dough | H is for Home

It’s a very quick and simple recipe; a basic dough of flour, raising agent, fat and liquid – but the end product… wow!

12 dough balls for making fried bakes | H is for Home

Fried bakes are traditionally eaten with fried fish (the famous bake & shark eaten al fresco at the beach) or buljol, a spicy salted fish dish.

Frying a bake in a wok full of hot vegetable oil | H is for Home

Here is a video of my aunt making fried bakes recently. This is what she advocates:

I decided that tapping the dough down into the oil, whilst turning it but by bit, results in it puffing up immediately.

As a vegetarian, I thought about what best to stuff them with. In the past, I’ve had them with extra mature cheddar, Branston pickle and salad. Perhaps smashed avocado or hummus with grated carrot. Instead, I went a step up and decided on fried bakes with grilled halloumi, salad and hot sauce.

Fried bake with grilled halloumi, mixed salad and topped with hot sauce | H is for Home

Click here to save the recipe to Pinterest

home-made Trinidad fried bakes | H is for Home
Fried bakes
Serves 6
These bakes are traditionally served with fried fish or buljol
Ingredients
  1. 260g/9oz plain flour
  2. 8g/¼oz butter/shortening
  3. 2 tsp baking powder
  4. ½tsp salt
  5. ½tsp brown sugar
  6. 190ml/6 fl oz water
  7. vegetable oil for fryingHome-made fried bakes ingredients
Add ingredients to shopping list
If you don’t have Buy Me a Pie! app installed you’ll see the list with ingredients right after downloading it
Instructions
  1. In a large mixing bowl, combine the flour, baking powder, salt and brown sugar
  2. Rub in the butter/shortening until the mixture resembles fine breadcrumbs
  3. Add enough water to just about make a soft dough
  4. Flour your work surface and knead for about 5 minutes
  5. Cover the bowl with a tea towel and rest the dough for 30 minutes
  6. Divide the dough into 2 equal pieces and then divide each into 6 equal pieces (getting 12 in total). Or, weigh the entire ball of dough and divide into 12 equal weights; mine were about 40g/1⅖oz each
  7. Rest the dough again for a further 5 minutes before rolling each piece into rounds about 7cm / 3" in diameter
  8. In a heavy-bottomed, deep frying pan or saucepan, heat the vegetable oil and fry each bake making sure that it's covered in oil (my aunt recommends spooning oil over the top of the bake as it cooks, to help it puff up)
  9. Carefully flip and fry the other side until fully ballooned or puffed
  10. Remove and drain on kitchen paper to remove excess oil
  11. Slice in half horizontally and load with your chosen filling
Print
Adapted from Trinidad & Tobago Guardian
H is for Home Harbinger https://hisforhomeblog.com/